This Article first appeared in a Medium blog post
Oracle Container Database (CDB) is a multi-tenant architecture that allows you to consolidate multiple Pluggable Databases (PDBs) within a single CDB.
If you are working with Oracle databases, then you might be familiar with Pluggable Databases (PDBs). PDBs are self-contained databases that share common background processes and memory structures. Cloning PDBs across CDBs can help you with database migration, backup and restore, disaster recovery, testing, and more.
Hot cloning of PDBs is a technique where your source PDB remains in Read-Write mode while you clone it. Hot cloning is supported since Oracle 12.2 onwards.
For this Demo we are using Oracle Base Database Service 19c (19.17) EE Databases
Pre-requisites
Terminology Used :
CDB — Container Database (root container)
PDB — Pluggable Database (User container where application data sits)
Before we start with the cloning process, we need to ensure that the Source and target CDBs fulfill certain requirements.
1. Same database version and patch level The source and destination CDBs must be at the same database version and the same or higher patch level.
2. Same or higher character set The destination CDB must have the same or higher character set than the source PDB. You can check the character set by running the following query:
SELECT property_name, property_value, description
FROM database_properties
WHERE property_name IN ('NLS_CHARACTERSET', 'NLS_NCHAR_CHARACTERSET')
ORDER BY 1;
3. The source PDB must not be closed.
4. If the remote CDB is not in local undo mode, then the source PDB must be open in read-only mode. See “About the CDB Undo Mode”.
5. If the remote CDB is not in ARCHIVELOG mode, then the source PDB must be open in read-only mode.
6. If you are creating a refreshable PDB, then the source PDB must be in ARCHIVELOG mode and local undo mode.
Solution Design
This article is a step-by-step guide to cloning PDBs across different CDBs in Oracle Cloud Infrastructure.
The Source and Target Databases VCN’s should be remotely peered across regions and Ports for Oracle Database connectivity should be open. To enable OCI VCN Remote peering refer here
- Source CDB Version 19.17 Enterprise Edition running on OCI Oracle Base Database Service — 2 Node RAC Cluster
- Target CDB Version 19.17 Enterprise Edition running on OCI Oracle Base Database Service — 2 Node RAC Cluster
Steps
Here are the steps to remotely clone PDBs across OCI regions:
Step 1: Check Character Sets Check the character sets in both the Source and Destination CDBs.
Use the following SQL query to check the character set:
set linesize 1000
col property_name for a30
col property_value for a20
col description for a40
SELECT property_name, property_value, description
FROM database_properties
WHERE property_name IN ('NLS_CHARACTERSET', 'NLS_NCHAR_CHARACTERSET')
ORDER BY 1;
Ensure that the Destination CDB has the same or superseded character set as the Source CDB.
Step 2: Create Sample PDB DEMOSYD in Source CDB
CREATE PLUGGABLE DATABASE DEMOSYD ADMIN USER pdbadmin IDENTIFIED BY PdbAdmin#_123 ;

ALTER PLUGGABLE DATABASE DEMOSYD OPEN READ WRITE instances=all;

SHOW PDBS;
Important Note : If you need to set the DB link name to allow a name other than DB name. Then you need to get GLOBAL_NAMES parameter to false in the Source and Destination CDB
This parameter can also be set at PDB level instead of CDB, if you want to hot clone a single PDB only.
Source CDB :
ALTER SYSTEM SET global_names=false SCOPE=both sid='*';

show parameter global_names ;

NAME TYPE VALUE
 - - - - - - - - - - - - - - - - - - - - - - - - - - - - - - - - - - - - - - -
global_names boolean FALSE
Target CDB :
ALTER SYSTEM SET global_names=false SCOPE=both sid='*';

show parameter global_names ;

NAME TYPE VALUE
 - - - - - - - - - - - - - - - - - - - - - - - - - - - - - - - - - - - - - - -
global_names boolean FALSE
Step 3: Create User to Clone the PDB Create a user to clone the PDB using the following SQL query:
ALTER SESSION SET CONTAINER=DEMOSYD;

SHOW CON_NAME;

CREATE USER clone_user IDENTIFIED BY YourPassword1234#_ ;

GRANT DBA TO clone_user;

GRANT CREATE SESSION, CREATE PLUGGABLE DATABASE TO clone_user;
Step 4 : Set Encryption Keystore and Encryption Keys in Source PDB
Use the following queries to check the encryption key in the Source PDB
SELECT * FROM v$encryption_wallet;

SELECT * FROM v$encryption_keys;
If no rows are returned then,set a key with backup on the Source CDB using the following SQL queries:
ADMINISTER KEY MANAGEMENT set KEYSTORE OPEN IDENTIFIED BY "YourPassword1234#_" container=all;

ALTER SESSION SET CONTAINER=DEMOSYD;

ADMINISTER KEY MANAGEMENT set KEYSTORE OPEN IDENTIFIED BY "YourPassword1234#_" container=CURRENT;

ADMINISTER KEY MANAGEMENT set key identified by "YourPassword1234#_" with backup USING 'ks_create'container=CURRENT;

SELECT * FROM GV$ENCRYPTION_KEYS ;
Step 5: Create TNS Entry on Target Database Nodes.
Create a TNS service in the tnsnames.ora file on the target host that resolves to the Source PDB. You can also use the full tns string in the CREATE DATABASE LINK command in the next step
Important : Make sure to add the entry to all the Nodes if target is a RAC cluster
# Node 1 Target DB :

$ vim $ORACLE_HOME/network/admin/tnsnames.ora

PDBSOURCE =
  (DESCRIPTION =
    (ADDRESS = (PROTOCOL = TCP)(HOST = 10.10.2.158)(PORT = 1521))
    (CONNECT_DATA =
      (SERVER = DEDICATED)
      (SERVICE_NAME = DEMOSYD.xxxxxxx.xxxxxx.oraclevcn.com)
    )
  )

Check connectivity from target to source

$ sqlplus clone_user/YourPassword1234#_@PDBSOURCE


# Node 2 Target DB :

$ vim $ORACLE_HOME/network/admin/tnsnames.ora

PDBSOURCE =
  (DESCRIPTION =
    (ADDRESS = (PROTOCOL = TCP)(HOST = 10.10.2.158)(PORT = 1521))
    (CONNECT_DATA =
      (SERVER = DEDICATED)
      (SERVICE_NAME = DEMOSYD.xxxxxxxx.xxxxxx.oraclevcn.com)
    )
  )

Check connectivity from target to source

$ sqlplus clone_user/YourPassword1234#_@PDBSOURCE
Step 6: Create Database Link on Target to Connect to the Source PDB using the following SQL query:
-- Create DB link in Target CDB --

CREATE DATABASE LINK PDBSOURCE CONNECT TO clone_user IDENTIFIED BY YourPassword1234#_ USING 'PDBSOURCE';

-- Test the database link by executing any SQL, as follows.

SELECT count(*) FROM dba_objects@PDBSOURCE;
Step 7 : Hot Clone the PDB in Target using the DB link we created above
First set ‘one_step_plugin_for_pdb_with_tde’ to TRUE, this parameter enables the target CDB to simplify the move of TDE keys in a single step PDB move operation. ONE_STEP_PLUGIN_FOR_PDB_WITH_TDE eliminates the need of having to manually provide a keystore password when you import the TDE keys into the PDB after it has moved to the target CDB.
Target CDB :
-- On Target CDB , Set this Parameter to TRUE :

ALTER SYSTEM SET one_step_plugin_for_pdb_with_tde=TRUE SCOPE=BOTH sid='*';
Create Hot clone of Pluggable db ‘DEMOSYD’ using dblink ‘PDBSOURCE’
CREATE PLUGGABLE DATABASE DEMOSYD FROM DEMOSYD@PDBSOURCE keystore identified by "YourPassword1234#_" including shared key refresh mode manual ;

SHOW PDBS;

CON_ID CON_NAME OPEN MODE RESTRICTED
 - - - - - - - - - - - - - - - - - - - - - - - - - - - - - -
 6 DEMOSYD MOUNTED
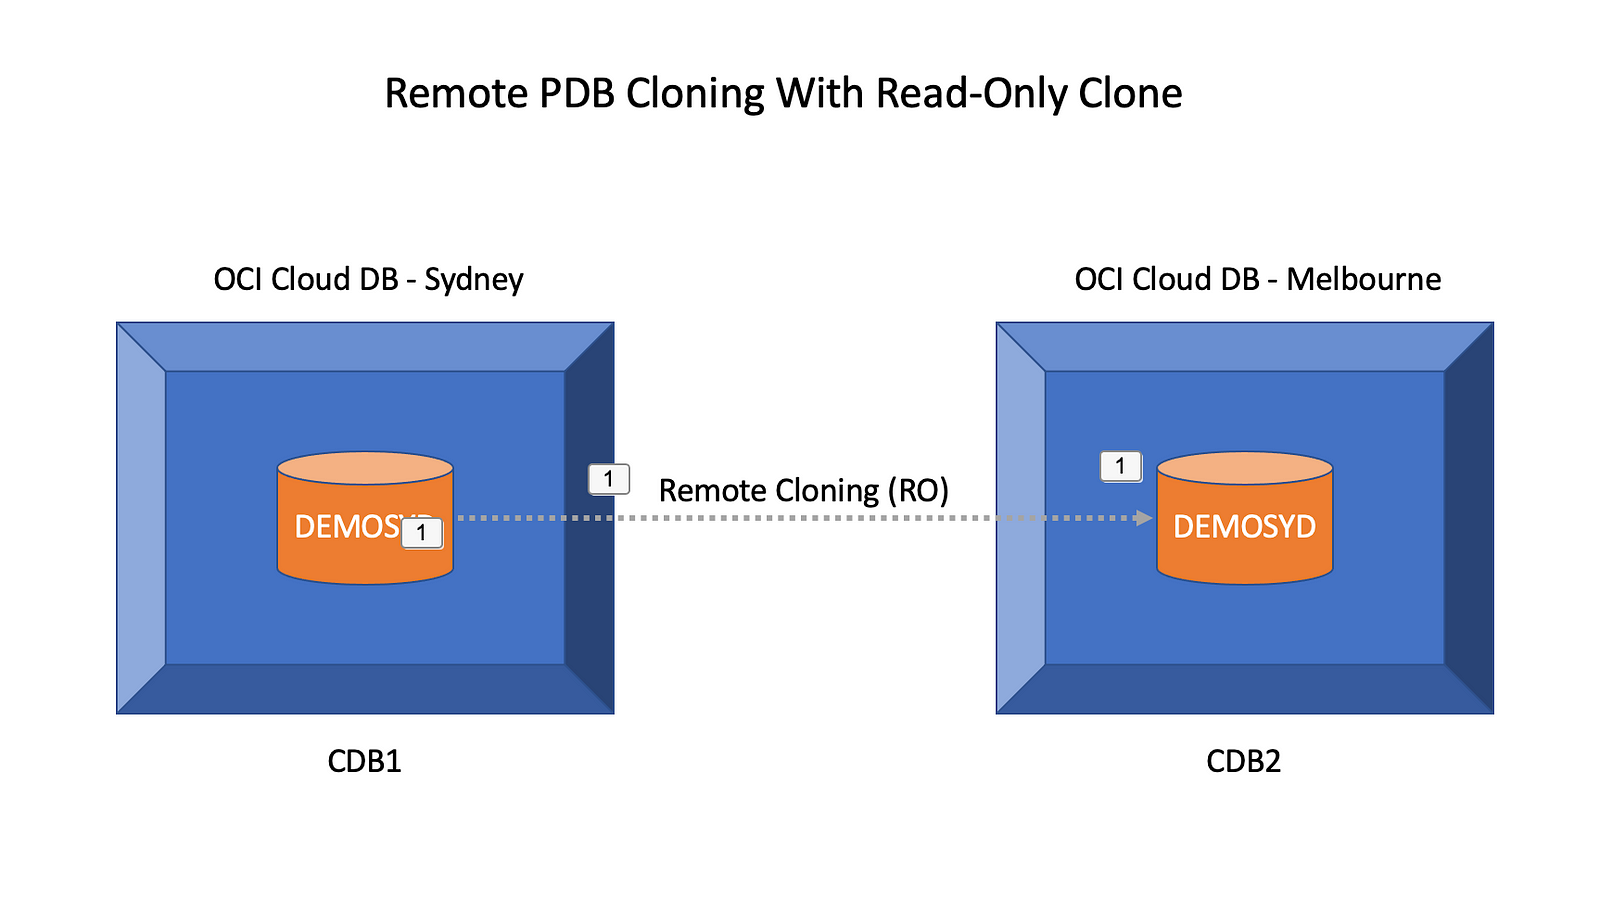
Open the freshly cloned database in Read-Only mode
ALTER PLUGGABLE DATABASE DEMOSYD open READ ONLY instances=all;


SHOW PDBS;

    CON_ID CON_NAME     OPEN MODE  RESTRICTED
---------- ------------------------------ ---------- ----------
  6 DEMOSYD     READ ONLY  NO
If your Source PDB is very large then it is better to run this operation via a Shell script as a background process to avoid disconnectivity in SQL*Plus in between cloning
####################################
Shell Script to Remotely Clone a PDB :
####################################
#!/bin/bash

# Function to display usage
function usage {
  echo "Usage: $0 -s <db_link> -d <pdb_name> -k <keystore_password>"
  echo "Options:"
  echo "-s, --sourcedblink  : The DB link for the source PDB."
  echo "-d, --pdbname       : The name of the PDB to clone."
  echo "-k, --keystorepass  : The password for the keystore."
  echo "-o, --outputlog     : The name of the output log file."
  echo "-h, --help          : Display this help message."
}

# Parse command line arguments
while [[ $# -gt 0 ]]
do
  key="$1"

  case $key in
    -s|--sourcedblink)
      SOURCE_DBLINK="$2"
      shift
      shift
      ;;
    -d|--pdbname)
      PDB_NAME="$2"
      shift
      shift
      ;;
    -k|--keystorepass)
      KEYSTORE_PASSWORD="$2"
      shift
      shift
      ;;
    -o|--outputlog)
      OUTPUT_LOG="$2"
      shift
      shift
      ;;
    -h|--help)
      usage
      exit 0
      ;;
    *)
      echo "Error: Unknown option: $key"
      usage
      exit 1
      ;;
  esac
done

# Check if required arguments are present
if [ -z "$SOURCE_DBLINK" ] || [ -z "$PDB_NAME" ] || [ -z "$KEYSTORE_PASSWORD" ]
then
  echo "Error: Missing argument. Please specify the source DB link using -s or --sourcedblink option, the PDB name using -d or --pdbname option, and the keystore password using -k or --keystorepass option."
  usage
  exit 1
fi

# Set default output log file
if [ -z "$OUTPUT_LOG" ]
then
  OUTPUT_LOG="clone_pdb.log"
fi

# Clone PDB
echo "Cloning PDB $PDB_NAME from source DB link $SOURCE_DBLINK"
sqlplus / as sysdba << EOF >> "$OUTPUT_LOG" 2>&1
  CREATE PLUGGABLE DATABASE $PDB_NAME FROM $SOURCE_DBLINK keystore identified by "$KEYSTORE_PASSWORD" including shared key refresh mode manual;
  ALTER PLUGGABLE DATABASE $PDB_NAME open read only instances=all;
  exit;
EOF

# Check if the PDB was cloned successfully
if [ $? -eq 0 ]
then
  echo "PDB clone complete. Check Alert Log to Verify 100% Success of Cloning"
else
  echo "Error: Failed to clone PDB. Please check the log file $OUTPUT_LOG for more information."
  exit 1
fi
Usage:
./clone_pdb.sh -s demosyd@pdbsource -d demotest3 -k YourPassword1234#_ -o output.log &
######################
Refreshing a PDB Clone :
######################
alter pluggable database DEMOSYD close instances=all;

alter pluggable database DEMOSYD refresh;

alter pluggable database DEMOSYD open read only instances=all;

show pdbs;
####################################
Shell Script to Refresh a PDB clone :
####################################
#!/bin/bash

# Function to display usage
function usage {
  echo "Usage: $0 -p <pdb_name>"
  echo "Options:"
  echo "-p, --pdbname  : The name of the PDB to refresh."
  echo "-h, --help     : Display this help message."
}

# Parse command line arguments
while [[ $# -gt 0 ]]
do
  key="$1"

  case $key in
    -p|--pdbname)
      PDB_NAME="$2"
      shift
      shift
      ;;
    -h|--help)
      usage
      exit 0
      ;;
    *)
      echo "Error: Unknown option: $key"
      usage
      exit 1
      ;;
  esac
done

# Check if required argument is present
if [ -z "$PDB_NAME" ]
then
  echo "Error: Missing argument. Please specify the PDB name using -p or --pdbname option."
  usage
  exit 1
fi

# Refresh PDB clone
echo "Refreshing PDB clone: $PDB_NAME"
sqlplus / as sysdba << EOF
  alter session set container=$PDB_NAME;
  alter pluggable database $PDB_NAME close instances=all;
  alter pluggable database $PDB_NAME refresh;
  alter pluggable database $PDB_NAME open read only instances=all;
  exit;
EOF
echo "PDB clone refresh complete."
Usage:
nohup ./refresh_pdb_clone.sh -p DEMOSYD &
Enable Auto-Refresh :
You can also do auto-refresh at an interval
-- Change to auto-refresh mode

alter pluggable database DEMOSYD refresh mode every 30 minutes;


COLUMN pdb_name FORMAT A30
SELECT pdb_id, pdb_name, refresh_mode, refresh_interval
FROM   dba_pdbs
ORDER BY 1;

    PDB_ID PDB_NAME     REFRES REFRESH_INTERVAL
---------- ------------------------------ ------ ----------------
  6 DEMOSYD     AUTO         30

-- Change it back to manual mode of refresh


alter pluggable database DEMOSYD refresh mode manual;


COLUMN pdb_name FORMAT A30
SELECT pdb_id, pdb_name, refresh_mode, refresh_interval
FROM   dba_pdbs
ORDER BY 1;


    PDB_ID PDB_NAME     REFRES REFRESH_INTERVAL
---------- ------------------------------ ------ ----------------
  6 DEMOSYD     MANUAL
###############################################
Putting PDB Clone in Read Write Mode in Target :
###############################################
Caution before you proceed — Once PDB is put into read-write mode it cannot be made refreshable again.
To make a PDB read-write you have to disable REFRESH. Once REFRESH has been disabled, the PDB can no longer be refreshed from the source.
-- CLose the PDB on Target on all Instances --

alter pluggable database DEMOSYD close instances=all;

-- Disable refresh --

alter pluggable database DEMOSYD refresh mode none;

alter pluggable database DEMOSYD open read write instances=all;

show pdbs;

CON_ID CON_NAME OPEN MODE RESTRICTED
 - - - - - - - - - - - - - - - - - - - - - - - - - - - - - -
 6 DEMOSYD READ WRITE NO
######################################
Infinite Read-Write PDB Clones in Target :
######################################
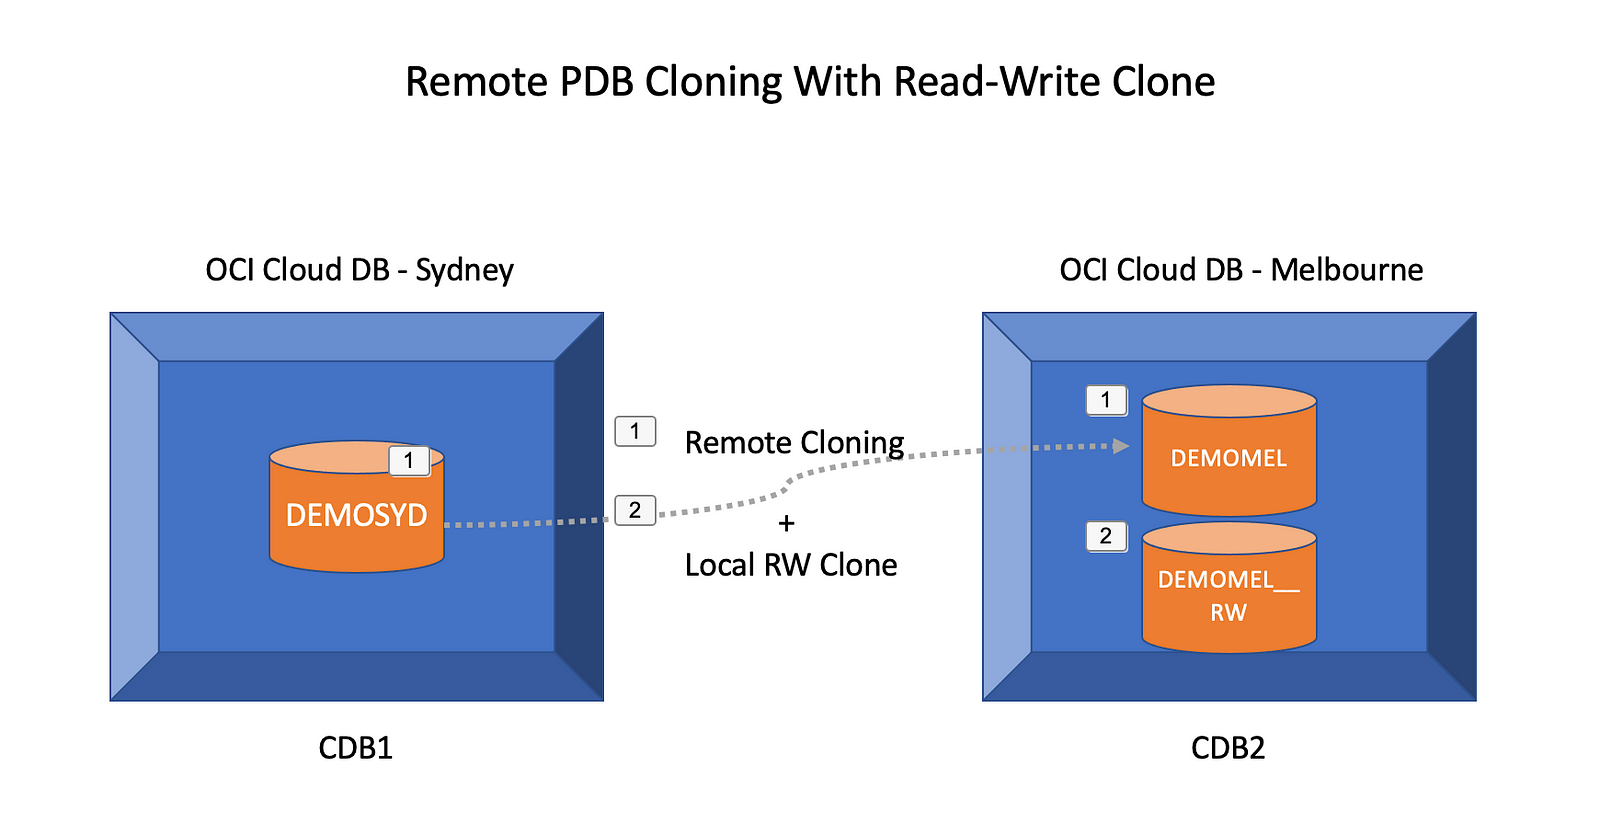
A better strategy for having READ WRITE clones is by creating another RW clone from existing Refreshable Clone PDB and keep the existing cloned PDB as READ ONLY and in REFRESH mode. This way you can have infinite (almost!) RW clones but with different names.
Please note to have more than 3 PDBs in a CDB, you need the Multi-tenant license.
For eg:
We will first create a new cloned PDB in target called ‘DEMOMEL’ from source
CREATE PLUGGABLE DATABASE DEMOMEL FROM DEMOSYD@PDBSOURCE keystore identified by "YourPassword1234#_" including shared key refresh mode manual ;

ALTER PLUGGABLE DATABASE DEMOMEL open read only instances=all;

-- Now create a new RW clone of the refreshable clone

CREATE PLUGGABLE DATABASE DEMOMEL_RW FROM DEMOMEL keystore identified by "YourPassword1234#_" including shared key ;

ALTER PLUGGABLE DATABASE DEMOMEL_RW OPEN READ WRITE instances=all;

SHOW PDBS;

CON_ID CON_NAME OPEN MODE RESTRICTED
 - - - - - - - - - - - - - - - - - - - - - - - - - - - - - -
 10 DEMOMEL READ ONLY NO
 11 DEMOMEL_RW READ WRITE NO
And you can continue to refresh the cloned PDB ‘DEMOMEL’ and keep creating new RW clones
alter pluggable database DEMOMEL close instances=all;

alter pluggable database DEMOMEL refresh;

alter pluggable database DEMOMEL open read only instances=all;
#################
Monitoring :
#################
You can monitor the refresh or clone operations of a PDB using V$SESSION_LONGOPS view in Oracle Database, which contains information about long-running operations in the database that are currently in progress.
set lines 2000
col opname for a30
col target for a6
col target_desc for a15
col #token for 9990

SELECT opname, target, target_desc,
totalwork, total_token "#token",
start_time, ROUND(token_size) token_size, sofar, pct,
' [ ' || to_char(trunc( (token_size * (sysdate - start_time ) / sofar * 86400) /3600), 'fm9900') || ':' ||
to_char(trunc(mod( (token_size * (sysdate - start_time ) / sofar * 86400),3600)/60), 'fm00') || ':' ||
to_char(mod( (token_size * (sysdate - start_time ) / sofar * 86400),60), 'fm00') || ' ]' TOTAL_TIME,
' [ ' || to_char(trunc( ((( token_size * (sysdate - start_time ) / sofar ) - ( sysdate - start_time)) * 86400)
/3600), 'fm9900') || ':' ||
to_char(trunc(mod( ((( token_size * (sysdate - start_time ) / sofar ) - ( sysdate - start_time)) * 86400),3600)
/60), 'fm00') || ':' ||
to_char(mod( ((( token_size * (sysdate - start_time ) / sofar ) - ( sysdate - start_time)) * 86400),60),
'fm00') || ' ] ' remaining_time,
sysdate + (( token_size * (sysdate - start_time ) / sofar ) - ( sysdate - start_time)) Time_to_Finished
FROM
(
SELECT opname, target, target_desc,
totalwork,
sofar,
CEIL(totalwork*8192/1024/1024/1024/128) total_token,
totalwork/CEIL(totalwork*8192/1024/1024/1024/128) token_size,
ROUND( sofar/( totalwork/CEIL(totalwork*8192/1024/1024/1024/128) ) * 100, 0) pct,
start_time
from v$session_longops
where sofar < totalwork
and totalwork != 0
and opname != 'RMAN: aggregate input'
)
order by opname, target;
The query also calculates the estimated time remaining for each operation, based on the progress so far and the total amount of work to be done.
#################
Troubleshooting :
#################
-- Verify PDB violations if PDB comes up in RESTRICTED=YES

alter session set container= DEMOSYD ;

SELECT * FROM PDB_PLUG_IN_VIOLATIONS ;

-- Verify Wallet from Target CDB

select * from gv$encryption_wallet ;
#################
Important Note :
#################
[1]
If you get below error then make sure the tns entry is added to tnsnames.ora file on all target nodes
*
ERROR at line 1:
ORA-65169: error encountered while attempting to copy file
+DATA/ORCL19C_MEL1PQ/F5592153D73C7700E0539E02B40ABB96/DATAFILE/sysaux.285.112953
0549
ORA-17627: ORA-12154: TNS:could not resolve the connect identifier specified
ORA-17629: Cannot connect to the remote database server
[2]
If you encounter below error then make sure Encryption Keystore and Encryption Keys in Source PDB is set correctly and the wallet is open and the PDB is keyed with master key
*
ERROR at line 1:
ORA-00283: recovery session canceled due to errors
ORA-28374: typed master key not found in wallet
Final Thoughts
Cloning a pluggable database can be a complex task, but it is an important one. It allows you to create copies of your databases for development, testing, or other purposes without having to go through the entire setup process from scratch.
In this blog post, we have discussed the steps involved in cloning a pluggable database using a database link. We have also covered some important scenarios, such as cloning a PDB in read-write mode with encryption keystore enabled and creating a refreshable remote clone.
By following the steps outlined in this post, you can create reliable, consistent clones of your pluggable databases that work as expected. As always, be sure to test thoroughly and take appropriate backups before making any changes to your databases.
Thanks for reading, if you liked this article please press the clap icon
Happy cloning!